Inspired by...
This module’s teaching approach is inspired by:
Agentic AI Programming for Python Course by TalkPython Training
🚀 AI-assisted development in 2025
If you haven’t used AI-assisted development tools yet, you’re about to experience a significant shift in how you write code. AI coding assistants can help you explore APIs, generate boilerplate, debug errors, and iterate on features much faster than traditional workflows.
🎯 Setting expectations
Before we dive into tools and techniques, let’s set the right mindset for working with AI.
Key mental model: Think of your AI assistant as a fast, eager junior developer who:
✅ Learns quickly and has read tons of documentation (but maybe not the latest stuff)
✅ Can scaffold code and explore APIs incredibly fast
✅ Sometimes makes mistakes or misunderstands requirements
✅ Benefits from clear instructions and iterative feedback
✅ Gets better with guidance and context
The right mindset:
Don’t get frustrated by small mistakes — iterate and guide
Review all generated code (you wouldn’t merge a PR without review)
Ask questions: “Why did you choose this approach?”
Treat errors as learning opportunities for both you and the AI
Don’t be afraid to roll back to the beginning and start over if AI doubled down on a wrong path
🧠 Understanding LLMs (large language models)
AI coding assistants are powered by Large Language Models (LLMs) — neural networks trained on vast amounts of text and code. These models can:
Understand context from your codebase
Generate code snippets based on natural language descriptions
Explain existing code and suggest improvements
Debug errors by analyzing stack traces and code patterns
☁️ Where LLMs live: deployment models
Frontier Models (Cloud-Hosted):
Deployment: Run on massive server infrastructure by model providers
Access: Pay-per-token via API keys
Examples:
Claude Sonnet 4.5 (Anthropic): Best coding model, $3/$15 per 1M tokens
GPT-5 (OpenAI): Best overall reasoning, $1.25/$10 per 1M tokens
Gemini 2.5 Pro (Google): Best for speed/context (1M tokens), multimodal, $1.25/$10 per 1M tokens
Claude 4 Opus (Anthropic): Best for long-horizon coding (30+ hour tasks), $15/$75 per 1M tokens
Pros: State-of-the-art capabilities, specialized for different tasks (coding vs reasoning vs speed), no local compute needed
Cons: Requires internet connection, ongoing costs, data leaves your machine
Mid-tier and efficient models (cloud or local):
Deployment: Can run on cloud APIs or self-hosted on consumer hardware
Examples:
Claude Haiku
Qwen3-30B-A3B (approaching GPT-4o performance),
Mistral Small 3.2
Llama 3.3-70B
Pros: Lower cost or free (if self-hosted), faster responses, good balance of capability and efficiency
Cons: Less capable than frontier models, self-hosting requires GPU resources (typically 16GB+ VRAM)
Open-source & open-weight models (2025 state-of-the-art):
Licenses: Vary from fully open (Apache 2.0, MIT) to restricted commercial use
Deployment: Can be self-hosted using tools like Ollama, LM Studio, or vLLM
Examples:
Qwen3-235B-A22B (Apache 2.0 license): 235 billion (235B) parameters with 22B active, 262 thousand (262K) token context, exceptional reasoning
GLM-4.5 (Open License): Strong coding and agentic abilities, runs on consumer hardware (laptops with 16GB+ RAM)
GLM-4.5 Air: Optimized for laptops with 48GB RAM when quantized
Qwen3-Coder: Specialized for code generation tasks
DeepSeek-R1: 671B parameters (37B active), MIT license, advanced reasoning (86.7% on AIME)
OpenAI GPT-OSS-120B/20B (Apache 2.0): Near o4-mini performance, runs on consumer hardware
Pros: Full control, no API costs, data stays local, latest open models often outperform closed frontier ones
Cons: Requires technical setup and adequate hardware (typically a laptop with 16GB+ VRAM for smaller models, 48GB+ for larger ones)
💡 Self-Hosting LLMs (Optional)
If you want to run models locally (for privacy or cost savings), tools like Ollama make it easy:
Privacy basics: When we say “for privacy,” we mean you can keep prompts, code, and any sample data on your machine rather than sending them to a third‑party API. This reduces the risk of accidental disclosure and can help with compliance when handling sensitive data (PII, credentials, customer data). You should still follow your organization’s policies (for example: scrub sensitive inputs, review telemetry/logging settings, and restrict network egress during development).
Learn more:
OWASP Top 10 for LLM Applications — common risks like data leakage and prompt injection
NIST AI Risk Management Framework (AI RMF 1.0) — governance and privacy guidance for AI systems
# Install Ollama
# macOS: Download from https://ollama.com/download/mac
# Windows: Download from https://ollama.com/download/windows
# Linux:
curl -fsSL https://ollama.com/install.sh | sh

# Download and run a recommended coding model
# For powerful machines (24GB+ VRAM):
ollama run qwen3-coder

# For laptops/consumer hardware (16GB RAM):
ollama run glm-4.5-air

# For reasoning tasks:
ollama run deepseek-r1

# Use with Cursor/Cline via OpenAI-compatible API
# Point to http://localhost:11434/v1
Model Selection Guide:
Best for coding on powerful hardware: Qwen3-235B or GLM-4.5
Best for laptops (48GB RAM): GLM-4.5 Air (quantized)
Best for consumer GPUs (16-24GB): Qwen3-Coder or DeepSeek-R1-Distill
Budget option: GPT-OSS-20B (runs on 16GB RAM)
Most AI tools can be “coerced” into using local models by configuring them to point to an OpenAI-compatible API endpoint.
🛠️ AI tools for extension development
Not all AI coding tools are created equal. In this workshop, we’ll use agentic AI tools that can understand your codebase, execute commands, and iterate with you—a fundamentally different and more productive experience than chat or autocomplete.
Why Agentic AI? Detailed comparison of AI tool categories
🥉 Chat-based AI (ChatGPT, Claude web interface)
How it works: You paste code snippets → AI gives you code back
Use cases:
✅ Quick one-off questions (“How do I use async/await in TypeScript?”)
✅ Explaining error messages
✅ Learning new concepts
Limitations:
❌ Doesn’t understand your codebase
❌ Can’t run tests or verify solutions
❌ Every conversation starts from scratch
❌ You’re the one integrating fragments into your project
Verdict: Good for learning, frustrating for building features.
🥈 Autocomplete AI (GitHub Copilot basic mode)
How it works:
Suggests code as you type (like enhanced IntelliSense)
Predicts what you’ll write next based on context
Use cases:
✅ Writing boilerplate code
✅ Completing obvious patterns
Limitations:
⚠️ Often 90% right (which means constantly fighting it)
⚠️ Interrupts your flow with suggestions
⚠️ No understanding of “correctness” — just statistical likelihood
⚠️ Can be distracting or helpful depending on your preference.
Verdict: Some people really prefer this mode (i.e. experienced developers who know when to ignore it, someone who prefers light touch AI interactions), but it can slow down beginners.
🥇 Agentic AI (Cursor, Claude Code, Cline, GitHub Copilot Workspace)
How it works:
Understands your entire codebase
Can execute commands (build, test, format)
Reads documentation and error messages
Works iteratively with you
Use cases:
✅ Building complete features from requirements
✅ Refactoring across multiple files
✅ Debugging with full context
✅ Generating tests based on implementation
✅ Updating documentation alongside code
Key difference: It doesn’t just suggest — it acts like a team member with tools.
Verdict: When building real features, prioritize agentic tools. They understand your codebase, execute commands, and iterate with you—a fundamentally different (and more productive) experience than chat or autocomplete.
We’ll work with Cursor to demonstrate the AI-assisted workflow, then repeat key steps using Claude Code for a CLI-based approach. Both tools offer similar capabilities, so you can choose whichever fits your preferred workflow after the workshop.
1. 🖱️ Cursor
What it is: A fork of VS Code with deep AI integration
Pricing: Free Hobby plan (includes one-week Pro trial, limited agent requests, and limited tab completions). Paid plans $20-200/mo offer extended/unlimited usage limits and faster response times. See cursor.com/pricing for details.
LLM Options:
Built-in models (Claude Sonnet 4.5, GPT-5, Gemini 2.5 Pro and more) with Cursor subscription
Best for: Developers who want a polished, GUI-driven experience
Alternatives
Windsurf (free tier, $15/mo Pro), GitHub Copilot Workspace ($10-39/mo), Cline (VS Code extension, free), Continue (VS Code/JetBrains extension, free or $10/mo Teams), Roo Code (VS Code extension, free or $20/mo Pro), Kilocode (VS Code/JetBrains, free or $29/user/mo Teams), Replit Agent (cloud-based)
Download: cursor.com
2. 💻 Claude Code
What it is: Command-line interface for Claude, optimized for coding workflows
LLM Options:
Requires Claude subscription or Anthropic API key. Can also work through cloud providers, like Amazon Bedrock
Works with Opus 4.1, Sonnet 4.5, Haiku 4.5, and other Claude models
Best for: CLI warriors who live in the terminal
Alternatives
Gemini CLI (free tier available), Cline (VS Code extension with CLI mode, free), Continue (IDE/terminal/CI agent, free), Plandex (designed for large projects), aichat (all-in-one LLM CLI), GitHub Copilot CLI, Aider (Git-integrated, open-source), Google Jules (async background agent, beta)
Install: See official setup instructions
Further Reading
Simon Willison’s blog on AI-assisted programming — Practical insights from a prolific developer
“Not all AI-assisted programming is vibe coding (but vibe coding rocks)” — Understanding different AI coding styles
Claude Sonnet 4.5 review — Simon calls it “the best coding model in the world”
Parallel Coding Agents — Simon’s October 2025 workflow with Claude Sonnet 4.5
Simon Willison’s Model Recommendations — Qwen3 and GLM-4.5 for open-source coding; Chinese models often outperform Western alternatives
Ollama Documentation — Self-hosting open-source models
LM Studio — GUI for running local LLMs
🏁 Getting started
📦 Repo
For this module, we will start with an existing extension that we built in chapter 2. If you are not caught up or just joining us for the afternoon session, please grab a reference implementation from our demo repository.
In 🧬 2 - Anatomy of an extension, we started off by cloning an official JupyterLab extension template. This template was recently enhanced to include AI-specific configurations and rulesets. Then, we built a JupyterLab extension that displays random images with captions from a curated collection.
Now, we’ll use AI to extend this viewer with image editing capabilities.
🔄 Option 1: Continue with your own extension
If you completed the anatomy module and want to continue with your extension:
Navigate to your extension directory:
cd ~/Projects/jupytercon2025-extension-workshopEnsure your extension is on the final commit from the anatomy module (with the layout restoration feature).
Verify your extension is working:
# Activate your environment
micromamba activate jupytercon2025

# Build and start JupyterLab
jlpm build
jupyter lab
Skip to AI tool below.
📥 Option 2: Fork the finished extension
If you’d prefer to start fresh or didn’t complete the anatomy module:
Ensure you are authenticated with GitHub CLI:
See Chapter 2 → Create a GitHub repository and clone it locally (steps 2-3) for GitHub CLI authentication and
gh auth setup-git.Fork the demo repository to your GitHub account and clone it locally:
cd ~/Projects
gh repo fork jupytercon/jupytercon2025-developingextensions-demo --clone --remote
cd jupytercon2025-developingextensions-demo
This sets
originto your fork andupstreamto the original, so you can commit and push to your fork while still pulling updates from the source repo.Install and verify the extension works:
# Create/activate environment
micromamba create -n jupytercon2025 python pip nodejs=22 gh "copier~=9.2" jinja2-time
micromamba activate jupytercon2025

# Install the extension in development mode
pip install --editable ".[dev,test]"
jupyter labextension develop . --overwrite
jupyter server extension enable jupytercon2025_extension_workshop

# Build and start JupyterLab
jlpm build
jupyter lab
Make sure your git tree is clean, there are no unsaved and uncommitted files. This is going to be important later
🛡️ Set up your safety net: Git workflow
Before diving into AI-assisted development, establish a safety workflow. AI can generate code that breaks your extension, so you need the ability to roll back instantly.
The Four Safety Levels:
Level 1: Unsaved      →  Files on disk (Cmd/Ctrl + Z to undo)
Level 2: Staged       →  git add (can unstage)
Level 3: Committed    →  git commit (can reset)
Level 4: Pushed       →  git push (permanent)
Keep an eye on Source Control
Open the Source Control view (
Ctrl + Shift + G)Keep this panel visible alongside your AI chat
You’ll review all AI-generated changes here before committing
We’ll cover the detailed git workflow when you start generating code in Exercise B.
⚙️ AI tool
We will be using Cursor and Claude Code throughout this tutorial. Please install them if you would like to follow along. Other tools work similarly, but we won’t cover them here.
🎨 Setting up Cursor
Download Cursor
Visit cursor.com and download the installer for your operating system
Install Cursor like any other application
Create a Cursor account
Launch Cursor
You’ll be prompted to sign in or create an account
Sign up for a free account
The Hobby plan includes a one-week Pro trial
⌨️ Setting up Claude Code
Install Claude Code
Follow the official setup instructions for your operating system.
Recommended: Native installers
macOS/Linux:
curl -fsSL https://claude.ai/install.sh | bashWindows PowerShell:
irm https://claude.ai/install.ps1 | iex
Alternative: npm (lives in your environment)
If you already have Node.js 22 installed in your
jupytercon2025environment:micromamba activate jupytercon2025 npm install --global @anthropic-ai/claude-codeSee the full installation guide for all options.
Set up AWS Bedrock authentication
We will be using Claude models provided by AWS Bedrock in this tutorial.
Required environment variables:
# macOS/Linux export AWS_BEARER_TOKEN_BEDROCK=your-bedrock-api-key export CLAUDE_CODE_USE_BEDROCK=1 export AWS_REGION=us-east-1 # or your regionAdditional customization (optional)
To customize models:
export ANTHROPIC_MODEL='global.anthropic.claude-sonnet-4-5-20250929-v1:0'
export ANTHROPIC_SMALL_FAST_MODEL='us.anthropic.claude-haiku-4-5-20251001-v1:0'
Recommended token settings for Bedrock:
export CLAUDE_CODE_MAX_OUTPUT_TOKENS=4096
export MAX_THINKING_TOKENS=1024
Why these token settings?
CLAUDE_CODE_MAX_OUTPUT_TOKENS=4096: Bedrock’s throttling sets a minimum 4096 token penalty. Setting lower won’t reduce costs but may cut off responses.MAX_THINKING_TOKENS=1024: Provides space for extended thinking without cutting off tool use responses.
By now, you should have:
✅ Cursor installed with a free account created
✅ Claude Code installed with an API key configured
✅ Your extension repository open and ready to work with
📋 Exercise A (15 minutes): Understand AI rules
Before jumping into code generation, let’s set up the “invisible infrastructure” that makes AI assistants work well. This configuration is what makes the difference between mediocre and excellent AI-generated code.
AI rules
AI Rules (also called Cursor Rules, or system prompts) are instructions that automatically precede every conversation with your AI assistant. They’re like permanent coaching that guides the AI’s behavior.
AGENTS.md: The Emerging Standard
In 2025, the AI coding ecosystem converged on AGENTS.md as the universal format for agent instructions. Emerging as an open standard with OpenAI convening an industry working group and growing adoption across the ecosystem, AGENTS.md replaces fragmented tool-specific formats—it’s just plain Markdown, no special schemas needed.
Tool Support Status:
| Tool | Support | Format |
|---|---|---|
| Cursor | ✅ Native | AGENTS.md + .cursor/rules/ |
| GitHub Copilot | ✅ Native | AGENTS.md (maintains .github/copilot-instructions.md for backward compatibility) |
| Zed Editor | ✅ Native | AGENTS.md |
| Roo Code | ✅ Native | AGENTS.md |
| Claude Code | ⚙️ Via symlink | Create: ln -s AGENTS.md CLAUDE.md |
| Gemini CLI | ⚙️ Via symlink | Create: ln -s AGENTS.md GEMINI.md |
| Aider | ⚙️ Config | Add to .aider.conf.yml: read: AGENTS.md |
| Continue.dev | ❌ Not yet | Use .continue/rules/ |
| Cline | ❌ Not yet | Use .clinerules/rules.md |
For this workshop, the official copier template provides AGENTS.md and can create symlinks for Claude Code and Gemini CLI. You should already have these rules configured in your repo if you selected ‘Y’ on the copier’s question about AI tools. Let’s understand what’s there and why it helps.
What’s in your AGENTS.md file
Open Cursor app
Set up cursor cli command
Open your extension folder in Cursor
cd ~/Projects/jupytercon2025-extension-workshop
# OR `cd ~/Projects/jupytercon2025-developingextensions-demo` if using a fork of example repo
cursor .
Take a moment to get familiar with the interface Main area for coding tabs, left side panel for file browser and extensions, right side panel for a chat interface. All should look very similar to VSCode or JupyterLab.
Check that the rules file exists: Look for
AGENTS.mdfile in your extension rootReview the ruleset file Open
AGENTS.mdKey sections you’ll find:JupyterLab-Specific Patterns:
How to register commands
When to use
ReactWidgetvsWidgetREST with
ServerConnection, state withIStateDB
Development Workflow:
Run
jlpm buildfor TS changes; restart Jupyter for Python changesDebug via browser console and server logs
Code Quality Essentials:
Prefer user notifications (
Notification.*,showErrorMessage); avoid leavingconsole.log()in committed codeDefine interfaces; avoid
any; use type guards
Project Structure:
Frontend in
src/; backend Python in<extension_name>/Commands in
src/index.ts; routes in<extension_name>/routes.py
Common Pitfalls to Avoid:
❌ No
document.getElementById()— use JupyterLab APIs❌ Don’t hardcode URLs — use
ServerConnection.makeSettings()❌ Don’t forget
dispose()methods❌ Don’t mix
npmandjlpm
Why this matters: These rules teach AI the JupyterLab patterns before it writes any code. Without them, AI might use generic React patterns or wrong APIs. With them, AI generates code that follows JupyterLab conventions from the start.
Customize your AGENTS.md
It can be helpful to modify the provided generic “JupyterLab extension” AI rules to include your favorite tools, package managers, and conventions.
Let’s modify the rules to include the package manager we are using and the environment name, so that the Cursor would have an easier time building our extension.
Open your AGENTS.md file and find the “Environment Activation (CRITICAL)” section. Modify it to specify our workshop environment:
 ### Environment Activation (CRITICAL)

 **Before ANY command**, ensure you're in the correct environment:

-```bash
-# For conda/mamba/micromamba (replace `conda` with `mamba` or `micromamba` depending on the prompter's preferred tool):
-conda activate <environment-name>
-
-# For venv:
-source <path-to-venv>/bin/activate  # On macOS/Linux
-<path-to-venv>\Scripts\activate.bat # On Windows
-```
+Use micromamba:
+```bash
+micromamba activate jupytercon2025
+```

 **All `jlpm`, `pip`, and `jupyter` commands MUST run within the activated environment.**
This tells the AI assistant to use micromamba with the jupytercon2025 environment that we’re using in this workshop, making it easier for the AI to run build commands correctly. If you use other environment manager, adjust accordingly.
Verify that Cursor recognizes the rules
Open the Cursor Chat panel (
Cmd/Ctrl + L) and choose Ask Mode
More Details on Model Selection
Model selection impacts both quality and cost.
Enable model selector:
Settings → Cursor Settings → General
Find “Usage Summary” → Set to “Always” (not “Auto”)
This shows your credit usage at bottom of chat panel
Choose models strategically:
Task Recommended Model Why Planning & Reasoning GPT-5 or Claude Sonnet 4.5 (Thinking) GPT-5 leads reasoning benchmarks; Claude excellent for extended thinking Coding (Best Overall) Claude Sonnet 4.5 “Best coding model in the world” per Simon Willison; 99.29% safety rate Long Coding Sessions Claude Opus 4.1 Sustains focus for 30+ hours, ideal for large refactors and multi-step tasks Speed & Long Context Gemini 2.5 Pro 1M token context, sub-second streaming, best latency Quick fixes Claude Haiku 4.5 or GPT-5 Mini Faster, cheaper for simple edits and routine tasks Local Development GLM-4.5 Air, Qwen3-235B, or DeepSeek-R1 Best open models for self-hosting on consumer hardware Avoid Auto Cursor picks cheapest, not best Watch your context usage:
Look for percentage in chat (e.g., “23.4%”)
Keep under 50% for best results
Above 70%? Start a new chat
Monitor credits:
Check
cursor.com/settings→ UsageTypical costs: Planning (0.30-0.50)
Start Big, Optimize Later For planning and architecture, always use the highest-quality model available:
Cloud: GPT-5 for reasoning, Claude Sonnet 4.5 for coding
Self-hosted: DeepSeek-R1 or Qwen3-235B-A22B
You can downgrade to faster/cheaper models (Claude Haiku 4.5, GPT-5 Mini, or GLM-4.5 Air) for routine edits, but don’t skimp on the thinking phase.
Paste the following prompt into a chat to verify that Cursor is using our rules:
What package manager should I use for JupyterLab extension frontend?AI should respond with
jlpm, notnpmoryarn- that comes from your AGENTS.md rules!Get ready for development. Start a new chat choose Agent Mode and send this prompt:
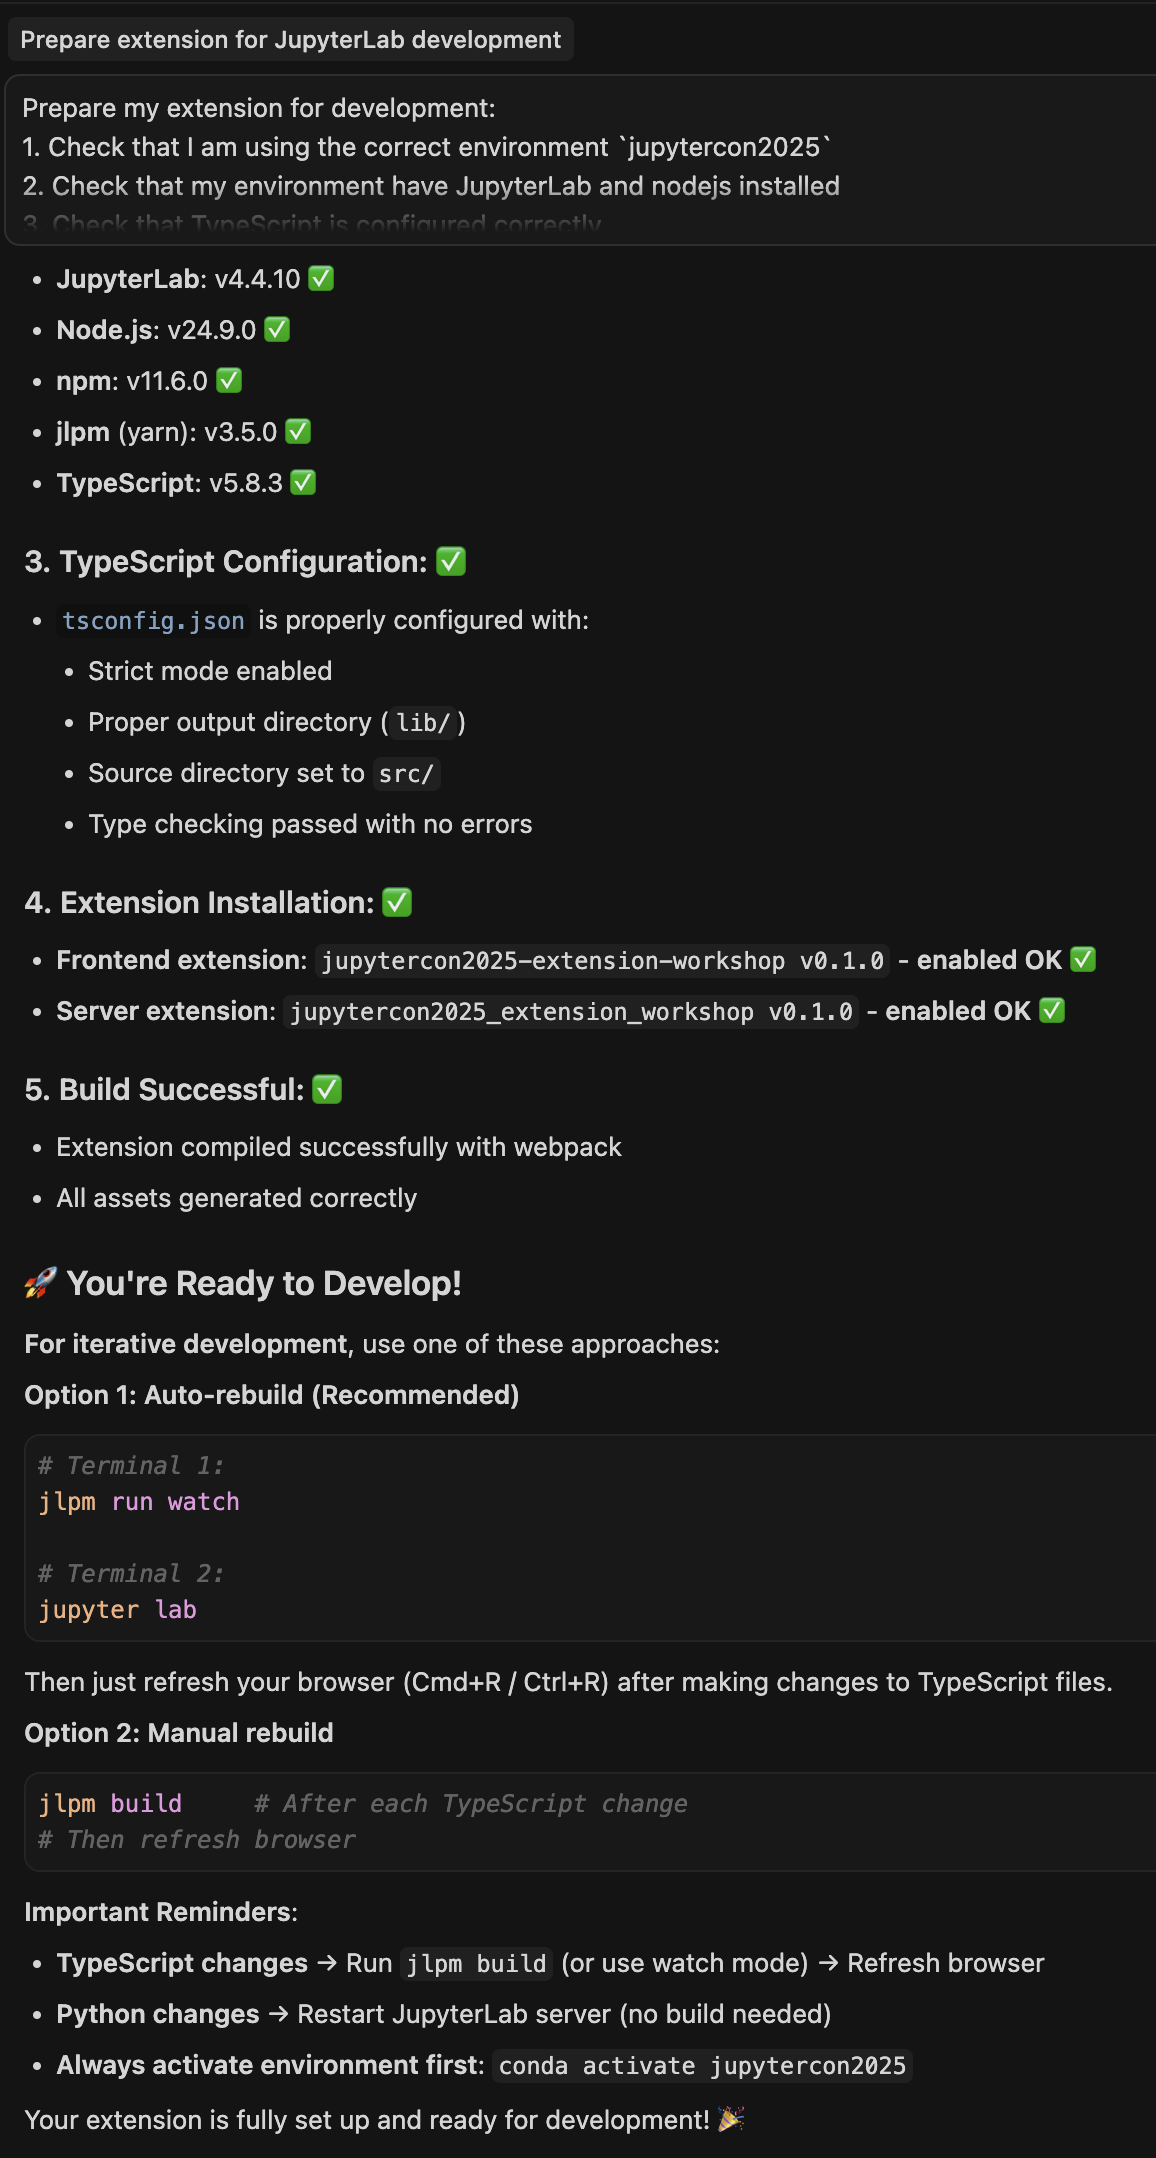
Prepare my extension for development:
1. Check that I am using the correct environment `jupytercon2025`
2. Check that my environment have JupyterLab and nodejs installed
3. Check that TypeScript is configured correctly
4. Verify extension is installed
5. Build my extension
AI should respond with (Claude Sonnet 4.5):
Checking your environment and switching to
jupytercon2025for the rest of the commandsVerify tools like
jlpmare available in the environmentChecking that extension is currently installed by looking into the outputs of
jupyter labextension listandjupyter server extension listBuilding the extension for you
Providing a summary of operations and suggestions on how to get it running
Here’s how it looks
🏗️ Exercise B (30 minutes): Build it!
🔄 Your git workflow for AI-generated code
Now that you’re about to generate substantial code with AI, let’s establish a disciplined workflow for reviewing and staging changes.
Adopt this workflow:
# After AI generates code:
# 1. Review changes in Source Control panel (Cmd/Ctrl + Shift + G)

# 2. Test if it works - build and verify
jlpm build
jupyter lab  # Test the feature

# 3. Stage changes you like (selectively):
git add src/widget.ts              # stage individual files
git add jupytercon2025_extension_workshop/routes.py

# 4. If AI continues and breaks something:
git restore src/widget.ts          # revert to last staged/committed version

# 5. Once everything works and is staged:
git commit -m "Add image filter buttons with AI assistance"

# 6. If you need to undo a commit (but keep the changes):
git reset --soft HEAD~1            # undo commit, keep changes staged

# 7. If you need to undo a commit AND the changes:
git reset --hard HEAD~1 # ⚠️ destructive - use carefullyKeep Source Control panel visible:
Ctrl + Shift + Gto openShows all modified files with diff preview
Click any file to see exactly what changed
Stage/unstage with + and - buttons
Understanding your starting point
Before we extend the functionality, a quick reminder on what the extension currently does:
| Current Features | New Features to Add |
|---|---|
| ✅ Displays random images from a curated collection | 🎨 Filter buttons (grayscale, sepia, blur, sharpen) |
| ✅ Shows captions for each image | ✂️ Crop functionality |
| ✅ Refresh button to load a new random image | 🔆 Brightness/contrast adjustments (slider controls) |
| ✅ Layout restoration (widget persists across JupyterLab sessions) | 💾 Save edited image back to disk |
| ↩️ Undo/redo buttons | |
| ⏳ Loading states and error handling |
Power and peril of one-shot prompts
Before we dive into our structured approach, let’s witness what modern AI can accomplish with a single, well-crafted prompt. This demonstration shows both the impressive capabilities and important limitations of AI-driven development.
With the right context and a detailed prompt, AI can build complete features in minutes. Here’s a prompt that could generate our entire image editing extension:
Extend this image viewer extension to add image editing capabilities:

Add editing controls to the widget:
- Buttons for filters: grayscale, sepia, blur, sharpen
- Basic crop functionality (50% crop from center)
- Brightness/contrast adjustments (slider controls)
- Save edited image back to disk

Use Pillow (PIL) on the backend to process images. The backend should:
- Accept the image filename and editing operation via REST API
- Apply the transformation using appropriate Pillow methods
- Return the processed image to the frontend as base64-encoded data

The frontend should:
- Update the displayed image immediately after each edit
- Show the current filter/transformation applied
- Allow chaining multiple edits before saving

Technical requirements:
- Add Pillow to the Python dependencies
- Create a new REST endpoint `/edit-image` in routes.py
- Add filter buttons to the widget toolbar
- Maintain the existing refresh functionality
What happens with this prompt?
When you give this prompt to an AI agent like Cursor or Claude Code, it will typically:
Analyze your existing codebase to understand the current structure
Make architectural decisions about implementation patterns
Generate 200+ lines of code across multiple files
Update dependencies in pyproject.toml
Create new endpoints in your backend
Modify the frontend widget with new UI controls
Run build commands to verify everything compiles
Send the prompt and watch as it generates the entire feature. In about 2-3 minutes, you will have a fully functional image editor!
Review the generated code
Cursor will suggest changes across multiple files
Read through each change carefully
Notice the architectural choices
Look for comments explaining the approach
Check if dependencies were added correctly
Accept or modify the suggestions
Click “Accept” to apply all changes
Or click individual files to review and edit before accepting
Test the functionality:
jlpm build
pip install -e .
jupyter lab
Test the new features:
Open the image viewer widget
Try each filter button
Check the browser console for errors (
F12orCmd+Option+I)Check the terminal running
jupyter labfor Python errorsFind at least 3 decisions you might have made differently
The hidden cost: Decisions made without you
While impressive, this one-shot approach makes numerous decisions on your behalf:
Architecture Decisions:
❓ Base64 encoding vs. temporary file URLs?
❓ Stateful vs. stateless image processing?
❓ Where to store edited images?
UI/UX Decisions:
❓ Button placement and styling
❓ Slider ranges and defaults
❓ Error message presentation
❓ Loading state indicators
Technical Implementation:
❓ PIL filter parameters (blur radius, sharpen intensity)
❓ Image format handling (JPEG quality, PNG transparency)
❓ Memory management for large images
❓ Caching strategy for processed images
Code Quality:
❓ Error handling approach
❓ TypeScript type definitions
❓ Test coverage
Visual debugging with screenshots
AI can understand what your extension looks like! This is powerful for debugging UI issues or requesting design changes.
Try it now:
Open your extension in JupyterLab (should still be running from earlier)
Take a screenshot of the extension widget:
macOS: Press
Cmd + Shift + 4, then drag to select the widget areaWindows: Use Snipping Tool or
Win + Shift + SLinux: Use your screenshot tool (varies by desktop environment)
Open Cursor chat (
Cmd/Ctrl + L) and drag or paste the screenshot into the chatTry one of these prompts with your screenshot:
[Drop screenshot here]

Please adjust the filter button spacing:
- Add 8px margin between buttons
- Increase padding inside each button to match JupyterLab's standard button styling
When to use screenshots:
✅ Layout and spacing problems (“buttons are misaligned”)
✅ Color and theming issues (“doesn’t match JupyterLab theme”)
✅ Showing desired design (“make it look like this”)
✅ Component placement (“move this above that”)
The debugging workflow for errors: Don’t manually debug—let AI help! It can read error messages, understand context, and propose fixes. If you encounter TypeScript compilation errors or Python exceptions, copy the error message into chat and ask AI to fix it.
Roll back when done
This is where your git safety net proves its worth! The one-shot prompt likely generated 200+ lines across multiple files. Let’s practice using the Four Safety Levels to safely undo everything.
To completely undo all changes made by the one-shot prompt:
# Level 2 → Level 1: Discard all changes to tracked files
git restore .

# Clean up any new untracked files created by AI
# (like new dependencies or generated files)
git clean -fd    # removes untracked files
git clean -Xdf # also removes files ignored by .gitignoreVerify clean state:
git status # Should show "nothing to commit, working tree clean"Now you’re ready to proceed with the structured, phased approach in Exercise C.
📊 Exercise C (20 minutes): Product manager framework
The better way: structured, iterative development
While one-shot prompts are impressive for demos, professional development requires a more thoughtful approach. We’ll now proceed with a structured workflow that:
Plans before coding - Understand the architecture first
Implements in phases - Build incrementally with checkpoints
Reviews each step - Catch issues early
Maintains control - You make the key decisions
Manages AI context - Start with fresh chats for each phase
This takes longer but results in:
✅ Code you understand and can maintain
✅ Architecture that fits your needs
✅ Proper error handling and edge cases
✅ Learning opportunities at each step
The rise of the product manager mindset
AI works best with detailed specifications, not agile “figure it out as we go.” Embrace structured planning.
Before generating any code, we’ll have AI create a phased implementation plan. This:
✅ Keeps AI focused and prevents scope creep
✅ Gives you a roadmap to refer back to
✅ Makes it easy to resume work across sessions
✅ Documents architectural decisions
Create a plans directory:
mkdir plansStart a new chat in Cursor and use this prompt:
I'm extending a JupyterLab image viewer to add image editing capabilities.

Please create a detailed implementation plan and save it to plans/image-editing-feature.md

**Requirements:**
- Add filter buttons (grayscale, sepia, blur, sharpen)
- Use Pillow (PIL) on the backend for processing
- New REST endpoint `/edit-image` for transformations
- Update frontend to display edited images immediately
- Basic crop functionality (50% from center)
- Brightness/contrast sliders
- Save edited image back to disk

**DO NOT WRITE CODE YET.** Create a phased plan with:

**Phase 1: MVP**
- Basic filter buttons (grayscale, sepia)
- Backend endpoint scaffolding
- Frontend display of processed images

**Phase 2: Advanced Filters**
- Blur and sharpen filters
- Crop functionality
- Brightness/contrast adjustments

**Phase 3: Polish**
- Save functionality
- Undo/redo buttons
- Loading states and error handling

For each phase, list:
- Specific files to create/modify
- Python/TypeScript dependencies needed
- Testing approach
- Potential issues to watch for

Save this plan to plans/image-editing-feature.md
Review the plan:
Open
plans/image-editing-feature.mdRead through each phase
Ask questions if anything is unclear:
In Phase 1, why did you choose to handle images as base64?
What are the alternatives?
Commit the plan:
git add plans/image-editing-feature.md
git commit -m "Add implementation plan for image editing feature"
Why this matters: You now have a versioned plan that AI (and you) can reference. As you work through phases, AI will stay focused on the current step.
Implement phase by phase
Start a NEW chat for Phase 1 (
Cmd/Ctrl + Lto focus on chat panel, thenCmd/Ctrl + Nto start a new chat)Reference the plan:
We are ready for Phase 1 of @plans/image-editing-feature.md

Please implement the MVP: basic grayscale and sepia filters with
backend endpoint and frontend display.
Note the
@plans/...syntax tells AI to read that specific file.Review changes in Source Control (keep this panel open!)
Open
Ctrl + Shift + Gto see all modified filesClick each file to review the diff
Look for unexpected changes or files you didn’t anticipate
Test the implementation:
jlpm build
jupyter lab
Try the new filter buttons
Check browser console (
F12) for errorsVerify backend logs in terminal
Stage and commit after Phase 1 works:
# Stage only the files you've reviewed and approved git add src/widget.ts git add jupytercon2025_extension_workshop/routes.py git add pyproject.toml # and more if needed # Commit with a descriptive message git commit -m "Phase 1: Add basic image filters (grayscale, sepia)"Start ANOTHER fresh chat for Phase 2:
We are ready for Phase 2 of @plans/image-editing-feature.md Phase 1 is complete. Now implement advanced filters (blur, sharpen, crop).Review, test, and commit after Phase 2 works:
# Review in Source Control panel, test the features
jlpm build
jupyter lab

# Stage and commit (review each file first!)
git add src/widget.ts
git add jupytercon2025_extension_workshop/routes.py
# add any other modified files
git commit -m "Phase 2: Add advanced filters (blur, sharpen, crop)"
Start ANOTHER fresh chat for Phase 3:
We are ready for Phase 3 of @plans/image-editing-feature.md

Phase 2 is complete. Now implement the polish features:
- Save edited image functionality
- Undo/redo buttons
- Loading states and error handling
Review, test, and commit after Phase 3 works:
# Review in Source Control panel, test the features
jlpm build
jupyter lab

# Stage and commit
git add src/widget.ts
git add src/api.ts
git add jupytercon2025_extension_workshop/routes.py
git add jupytercon2025_extension_workshop/image_processing.py
# add any other modified files
git commit -m "Phase 3: Add save, undo/redo, and error handling"
Prompts as user stories
Now that Phase 3 is complete (with undo/redo, save, and history), consider adding a feature like Custom Filter Presets.
Want to continue exploring?
If you finish early or want to continue exploring, try implementing more features:
Selective crop tool: Replace the basic center crop with an interactive selector tool that lets users drag to define the crop area
Image rotation: Add 90-degree rotation buttons (clockwise and counter-clockwise)
Filter preview: Show a small preview thumbnail for each filter before applying it
Keyboard shortcuts: Add keyboard shortcuts for common filters (g for grayscale, s for sepia)
Before/After comparison: Add a split-screen or toggle button to compare the original image with the edited version
Wrap up
Key takeaways
✅ AI excels at:
Scaffolding and boilerplate - New endpoints, UI components, tests
Navigating unfamiliar APIs - Pillow, new JupyterLab features
Systematic tasks - Following patterns, applying transforms
Explanation and education - “Why did you choose this approach?”
Self-correction - Fixing build errors, addressing type issues
Iterative refinement - Adjusting based on your feedback
⚠️ AI may struggle with:
Complex architectural decisions - When to use State DB vs. props
Complex async bugs - Race conditions, timing issues, subtle promise chaining errors
Performance optimization - Knowing when code is “fast enough”
Project-specific conventions - Without AGENTS.md guidance
Ambiguous requirements - “Make it better” vs. specific criteria
🎯 The sweet spot: AI is most effective when you provide:
Clear requirements (Product Manager mindset)
Project context (AGENTS.md rules, documentation)
Phased plans (not trying to do everything at once)
Iterative feedback (junior developer coaching)
Safety nets (Git commits at each checkpoint, testing)
💾 Final Git commit and push!
git add .
git commit -m "Complete image editor feature"
git push
🖥️ Demo: AI from the command line (10 minutes)
Start an interactive session:
claudeSend the prompt from Exercise B:
Use the same one-shot prompt from Exercise B to add image editing capabilities. Claude Code will read the referenced files automatically as you mention them in your prompt.
Review and apply changes:
Claude Code will show diffs for each file
Type
yto accept,nto skip, oreto editChanges are applied directly to your files
Claude Code tips
Run commands without leaving the chat:
Can you also run `jlpm build` to verify this compiles?or run the commands inside Claude Code by triggering bash mode with !.
Claude Code will see your command and outputs and might use them later, i.e. for debugging
Ask for explanations:
Before you change the code, explain how Pillow's ImageFilter.BLUR works
and why you're choosing this approach.
Request tests:
Generate pytest tests for the new /edit-image endpoint.🤔 Reflection and next steps
Phew! 😮💨 That was a lot! Now we’ve completed our exercises let’s take a moment to reflect:
💭 Quick reflection
Think about these questions — we’ll discuss as a group:
What surprised you most about working with AI?
Did it understand JupyterLab patterns better or worse than expected?
Were there moments where it “just got it” vs. moments where you had to guide it heavily?
Which technique was most valuable for you?
Planning first with phased implementation?
Using screenshots for UI debugging?
Starting fresh chats to manage context?
The AGENTS.md rules and documentation setup?
What would you do differently next time?
More detailed planning upfront?
Smaller phases?
Different prompting approach?
🔑 Key takeaways
🎓 Challenge extensions (optional)
🎯 What’s next?
You’ve now experienced the complete AI-assisted development workflow:
✅ Used AI to generate code for new features
✅ Debugged issues by iterating on prompts
✅ Learned to provide effective context and constraints
✅ Understood when to accept AI suggestions vs. when to customize
🌟 Continuing your journey
The next chapter provides independent exploration time where you can:
Build your own extension from scratch - Using the template and proven project ideas
Contribute to existing extensions - Give back to the community and learn from production code
Choose the path that interests you most, work at your own pace, and instructors will be available to help when you get stuck.